Saturday, July 10, 2010

Lemon Raspberry Bars


I decided that I had to post this recipe right away today because of how my fiance reacted to it. Yes, fiance! Adam and I got engaged June 22...it was a complete surprise to me and the event rendered me quite speechless. For those of you who know me, you know that does not happen very often.

Yesterday at work I was quickly browsing through Pioneer Woman's website and found this recipe that originally came from Two Peas and Their Pod, another of my favorite food and recipe blogs. It sounded amazing and looked to pretty and fresh. I ended up going to Kroger to get ingredients for this and also for my Thai Chicken Pizza that I make about once a month when Adam is at work. This recipe was super fast and easy to make, and oh man the lemon smell was phenomenal. Adam walked in and said "Yum, what are you making? Smells good! Lemon?"

I finished the dessert and put it in the fridge where it stayed until this morning when Adam was getting in there to get stuff for lunch (Pesto with Three Cheese Tortellini, yum!). At that time, he proceeded to take it out and try and bite. I was so shocked at his reaction which basically consisted of "Yum", "Oh my God.", and "I could eat this whole pan". I tried it and had to agree that is was pretty amazing. He later, after grabbing the pan and running for the living room and away from me, told me that "This is my favorite thing you have ever made!". Coming from Adam the picky-eating-chef of a fiance, I took that to mean that this was a WINNER! Try it, you won't regret it. This was also the first time I ever zested anything and it was fun!

Lemon Raspberry Bars

CRUST:
1-½ cup Graham Cracker Crumbs
6 Tablespoons Salted Butter, Melted
¼ cups Sugar
1 whole Lemon Zested

FILLING:
2 whole Egg Yolks
1 can Fat Free Sweetened Condensed Milk, 14 Oz.
½ cups Fresh Lemon Juice
1 teaspoon Lemon Zest
6 ounces Fresh Raspberries

Preheat the oven to 350F. Spray a 8 by 8 inch baking dish with cooking spray. Set aside.

In a medium bowl, combine the graham cracker crumbs, melted butter, sugar, and lemon zest. Stir until graham cracker crumbs are moist. Press crumbs into the prepared pan, pressing the crust mixture one inch up the side of the pan. Bake for 10 minutes. Remove from oven and allow to cool to room temperature.

Once the crust is cool, combine the egg yolks and condensed milk until well mixed. Stir in the lemon juice and lemon zest. Stir until mixture begins to slightly thicken. Gently fold in the raspberries. Fold carefully so you don’t break the raspberries.

Pour the lemon raspberry filling evenly over the graham cracker crust. Bake for 15 minutes, or until just set.

Cool to room temperature, then chill for at least one hour before serving. Will keep up to days. Cut and serve.

Note: use fresh raspberries and make sure you gently fold the berries into the lemon filling, or you will have pink bars.

Wednesday, June 16, 2010

My Grandma's Mexican Cornbread


As I said the other day when I posted my grandma's cake recipe, it was just a Grammy's recipe day. I had called my Grandma on Friday to get her Upsidedown Cake recipe again (it ran away) and she ended up being at my mother's house. So the next day when she was home she called and we "talked shop" for a while on her recipes. This is one of them that just came to my mind and sounded great, so she gave me the recipe for it.

This dish is super easy and has always been one of Grammy and I's favorite recipes. Just like the cake, I can remember eating this for a long time. It actually originally came from my Aunt Tina. It had been so long since I had eaten this that I was like a kid in a candy store while making it and ended up forgetting the cheese because I was so excited to get it done and try a bite. However, if I would have remembered I may not have even included it. The grandparents and I usually don't put cheese on this dish or runzas, it is usually added for my mother. :)

My Grandpa, if I remember correctly, puts salsa on his so your could give that a try. I had Adam try it and he said "it's not bad, a little sweet for me" He is crazy though, anything with corn in it he ends up saying it's "too sweet". I don't get him sometimes lol, such a picky eater for being a chef...Weird!

This recipe is originally way too big for just me, or even the both of us. I am posting the larger recipe, but just know that you should cut it in half for 4 or less people if you want a little bit of left overs.

Enjoy!

Ingredients:

-3 Pouches of cornbread/corn muffin mix (preferably Mexican cornbread, but it's hard to find)
-3 pounds hamburger
-1 whole bell pepper (chopped) Pick your faves, I used red and green
-1 whole onion (chopped)
-2 cans whole kernel corn (drained)
-2 cans creamed corn
-1 1/4 teaspoon baking soda
-3/4 cup milk
-2 eggs
-parsley and garlic
-8 oz cheese (usually cheddar, but whatever you want)


Mexican Cornbread

*Brown hamburger, onions, and peppers in pan. Add a pinch or so of parsley and garlic (mix in) right before draining. (I actually just cooked mine with a large chopped garlic clove)

*Mix remaining ingredients well (except cheese)

*Grease a 9x12 baking dish and put half of corn mixture into pan

*On top of that layer all of the hamburger mix

*Sprinkle cheese on hamburger mix (I forgot and actually prefer it without cheese)

*Add remaining half of corn mix on top

*Bake at 350 degrees for 35 minutes

Sunday, June 13, 2010

My Grandma's Strawberry-Rhubarb Cake


Don't get me wrong, there are TONS are dessert recipes that I love and adore. However, I am not kidding in the slightest when I say that this is my FAVORITE dessert EVER. Honestly, if I could only eat one dessert for the rest of my life, this would be it. Hands down, the best. Today is just a Grammy recipe day, since my late lunch/early supper is also one of her recipes.

I have been eating this Strawberry-Rhubarb cake as far back in my life as I remember. My grandmother has made it over and over again. Since I moved away to college (granted only a little over an hour away), every time I come home to visit she asks me what I want for lunch and so on. This is even more so true now that I am away at grad school in Ohio. It never fails that I either always ask for this cake or she just makes it on her own without me asking because she knows that it is my favorite. The only dessert that I usually ever ask for besides this is caramel cake with caramel frosting, but that is only for my birthday. :)

This cake is tried and true and I honestly have never ever met anyone who did not like it. My friend and fellow blogger Tessa and I made it a few years back in Omaha (when I still lived in the state). She and her hubby Derek both really enjoyed it. Then there is the boyfriend and picky chef Adam. My grandma made this for me when we went home over spring break this year. Adam tried one bite and fell in love with the cake, maybe more with the cake than with me. Kidding :)

**I will be honest and tell you that this is NOT healthy at all, but it is soooo good**

Now for your promise to me...You must promise me that you will only make this cake if you try it my way (and my grandmother's) first. Yes, you could eat it plain. Yes, you could put whipped cream on it. No, you will not do this right away because...do us both a favor and try it this way first: *Microwave a piece so it's slightly warm and put a nice scoop of vanilla ice cream with it.*

The combo of cold and warm is perfect here. I hope that you love this as much as my grandmother, Adam, and I do. :)


Ingredients:
-5 cups chopped rhubarb
-1 dry yellow cake mix
-1 cup sugar
-1 stick butter or oleo
-1 packet (3oz) dry strawberry jello mix
-1 1/2 cups water

Strawberry-Rhubarb Cake

*Spread chopped rhubarb in the bottom of 9x12 pan.
*Sprinkle on dry jello mix, followed by sugar,
*Sprinkle on dry cake mix evenly
*Melt butter in with water in microwave until mixed thoroughly
*Poor butter/water mixture over top of rhubarb/dry mixture
*Bake for 45 minutes at 350


Remember your promise to try it our way first ;)

Saturday, June 12, 2010

Chicken Shawarma


I found this recipe on my friend Tessa's cooking blog. She is the one that actually originally got me into the whole cooking blog, so thank you Tessa! Her hubby made this for the two of them a while back and it just sounded amazing. I was looking for something fairly easy to make, and quick too, and this just seemed perfect at the time. I have a few comments to make on the parts of the dish, but don't ready too heavily into my criticism and if you start you need to read the ENTIRE post to get the real outcome.

Let's start with the chicken itself. I, like Tessa and her husband, LOVED the chicken in this dish. It was to die for and could easily be eaten by itself. Next time I actually might combine the chicken with rice, hard boiled egg, and potatoes for a dish. Yes, I am sure that sounds weird, but it is actually pieces of authentic Indian dishes that my friend Debjani (from India) made for us one night. It would be a great combo. I will let you know how it works out. :) Speaking of Debjani, she was my savior for this recipe as she lives right below me in the apartment complex and I got home to realize that the recipe called for curry and I did not have any. Being from India, she has MANY kinds of curry, she gave me a simple chicken curry. Thank you Debjani!

As far as the sauce goes, I felt like it was trying to be tzatziki sauce, but fell short. I went to Kroger to find Tahini for the sauce and it took forever. Not to mention that when I found in a smaller jar was $8.00. I thought "wow" since I only needed 2 tablespoons and it was just for the sauce. The sauce was good, but it reminded me of yogurt (duh) with a hint of hummus (from the tahini). I think that it would have been just a tasty to use hummus for the sauce and would have been MUCH cheaper since the tahini would not have been necessary, but that is just me :)

I also added fresh mushrooms and onions to the mix, which was awesome. I could not find flatbreat at Kroger to save my life, so I bought wheat pita bread instead. They were small (all I could find) and while they went fine taste wise, they fell apart. In the end, the recipe was not sure whether it wanted to be Greek or Indian, lol.

Overall, I really enjoyed this recipe, it was easy, light, and the chicken was super yummy! I better get this post wrapped up as my cake in the oven is almost done. Smells soooo good! That post is soon to come along with a few more.

Chicken Shawarma

Ingredients:
1 lb. boneless, skinless chicken breasts, sliced into strips (I just used thin sliced breasts)
2 Tbsp. lemon juice
1 tsp. curry powder
2 tsp. extra-virgin olive oil
3/4 tsp. salt
1/2 tsp. ground cumin
3 garlic cloves, minced

1/2 c. plain reduced-fat Greek yogurt
2 Tbsp. tahini
2 tsp. fresh lemon juice
1 garlic clove, minced
4 pieces whole-wheat flatbread (I used wheat pitas)
1 c. romaine lettuce
2 tomatoes, diced
chopped onion (I added)
chopped fresh mushrooms
( I added)

In a medium bowl, combine lemon juice, curry powder, olive oil, salt, cumin, and minced garlic. Add chicken and toss to coat. Let sit at room temperature for 20 minutes. To prepare the sauce, in a small bowl, whisk together yogurt, tahini, lemon juice, and 1 clove minced garlic. Set aside.

Spray grill grates with cooking spray and pre-heat the outdoor grill. Place chicken strips on the grill (can place on skewers if desired). Grill for 4 minutes on each side or until chicken is fully cooked. (I did mine in the oven at 350 degrees until done, about 20 minutes)

Place pitas on grill rack and grill for 1 minute on each side or until lightly toasted.
Place 1 pita on each plate. Top with chicken, lettuce, tomato, and sauce and any extras you want.


Enjoy! Yum!

Friday, June 11, 2010

Fresh Basil, Roasted Red Pepper, and Goat Cheese Stuffed Chicken Breasts

Okay, until now I could take full credit for everything that I have posted on my blog (for actually cooking it that is). However, that time has come to an end. I came home Tuesday to Adam making supper, which was great because... 1.) I didn't have to make it 2.) It was amazing and 3.) I was exhausted from a run around day in the lab.

I can take no credit for this dish whatsoever. He, being a chef, pulled this idea right out of his wazoo. The verdict...it was AMAZING!

Now don't go telling him (the whole 3 people who may read this) that I posted the "Chef's Secrets" on here, lol. This is what I got out of making the recipe since I was not actually there.

Stuffed Chicken
*Boneless, skinless chicken breasts
*Bread crumbs
*Olive oil
*Goat Cheese (about the size of a roll of quarters will be enough for 3-4 chicken breasts)
*Roasted red peppers (jarred or homemade)
*Fresh Basil

-Butterfly cut the chicken (gives you a long, thin breast for rolling later)
-Line one side with a few half leaves of fresh Basil (3-4 halves)
-Finger pat goat cheese (about a tablespoon or a little less) onto basil leaves, like pressing dough out.
-Line with roasted red peppers
-Roll chicken breast up
-Brush with olive oil and sprinkle with bread crumbs
-Bake until done

These were amazing. Sorry that the picture is not so great. I took it with my phone right before dinner.

Pico de Gallo and Guacamole-Yum!

I have always loved Pico de Gallo. I get it on so many different things and at so many different restaurants from Amigos to Fudruckers...Fudruckers has amazing Pico de Gallo. Seriously, it's to die for! Which is also how I feel about Chipotle's guac, it is truly amazing and made fresh every day.

Loving them both, I have been wanting to make them forever, but for some reason just never got around to it. Well, a few weeks ago I finally did it...I made them both. I had my friends Aaron and Ian over for dinner on a Friday (Aaron and I typically cook together on Fridays and Ian is there every other week as well). Our Fridays are always filled with good fun, music, amazing food, and sometime even a night full of Texas Hold 'Em. We all three love Mexican food and decided to make it a Mexican themed night. Stay tuned for a later post for the main event which was utter BLISS! Super easy since you use the Pico to make the Guac.

I took both of these recipes from The Pioneer Woman Cooks cookbook, which I have talked about before. The only thing that we changed was adding quite a bit more salt that Ree used. We did it "to taste" and the Pico turned out just lovely. The Guac was also really good, although a few changes might be added next time. However, the three of us ended up literally eating it ALL...the pico and the guac.

Enjoy!

Pico de Gallo
*5 whole Plum (roma) Tomatoes
*½ whole Large (or 1 Small) Onion
*3 whole Jalapeno Peppers
*Cilantro
*Lime Juice
*Salt To Taste

Chop up tomatoes, onion and jalapenos and mix together. I did not add the jalapeno seeds because they make it hotter and I was not sure how I felt about the jalapenos in the first place. Wear gloves whem handling them.

Chop cilantro to your preferred size and add to taste...for us..LOTS. Squeeze the juice from half of a lime into the mixture and add salt to taste. Stir and enjoy!


Guacamole:
*3-4 soft, buttery avacadoes
*Pico de Gallo
*Half of lime
*Salt

Cut avocados length wise, take pit out, and scoop "meet" into a bowl. Mush with a fork until the consistency that you want...it should be chunky though. Add large scoop of Pico de Gallo (how ever much you want), squeeze juice of half a lime in, salt to taste. Mix and enjoy!


NOTE: Guac keeps less than 24 hours after made. Pico between 24 and 48. So make accordingly the day you want to eat it.

Thursday, April 22, 2010

Chocolate Banana Pie with Burnt Chockolate Chip Cookie Crust


I have been on a roll today. (Written a few weeks ago ) Like I said in my last blog, I dirtied as many dishes tonight as I washed when I got home...again, here is proof. Again, ugh to the dishes. Sadly, these don't even include the ones I dirtied making this dessert. For some reason I have been on a blogging mission the last 24 hours and I am on cloud 9 right now. I actually had to sit down now with a beer in hopes of calming down a bit from the cooking high, lol. No kidding.


Let's face it. We have all burnt a batch of cookies at least once. Whether you forgot to set the timer or just flat out got busy and didn't hear it, it has happened to us all. Well, the other day one of my sister's friends was making cookies for my Mom to take to a meeting and she accidentally burnt a batch and I mean they were hard as a rock, or so I hear. My mother, being the creative and resourceful one, did not want to throw a double hard as a rock cookies away so she improvised and used them in another way that was equally delicious.

So, I set off on a mission tonight to purposefully crispy-critter my chocolate chip cookies. I mean that. I put them in the oven and went and took a shower, read some recipes, and did some other stuff until I knew that they were going to be hard as a rock, lol. I really wanted to try her idea of using them as a pie crust. I didn't even make cookies the normal way since we were just given a batch of chocolate chip cookies last week by a friend...which Adam gobbled up like the cookie monster. When my mom did this she just make the crust and put chocolate pudding inside. It was a huge hit at a gathering she went to and she came back without a piece Monday. I tweaked it a little by adding bananas because I know that Adam like the combination. :) He got home right as I was putting the crust together and he grabbed pieces of it and ate it all burnt and crushed...like I said...COOKIE MONSTER!. So here you go.


Obviously Burnt :)

*Burn (either intentionally or by accident, each are equally full of love) about 12 chocolate chip cookies

*Let cookies cool and then crunch up into pieces with a rolling pin

*Add about 2 tablespoons of melted butter and mix together.

*Flatten into a pie pan and up the walls to make a crust.

*Line crust with banana slices (or don't like my Mom)

*Cover and refrigerate until pudding has set up.

*Slice and serve with cool whip (or without)

Sadly I don't have an image of a slice, trust me it was yummy!

Olive Cheese Bread and Sorrisos


For those of you who know me, you know that I HATE doing dishes. Washing dishes is my least favorite household chore to do, by far and boy did I have a LOT of them to do when I first got home from work/school tonight. There is proof for you, plus a few more on top of those.

YUCK! No fun!

However, for some reason after washing all of these I felt compelled to dirty a whole other sink full of them in the process of making a late supper tonight...and dessert. Everything I have been doing since getting home about 6:00 or so has in one way or another related to cooking. Whether it be washing dishes, looking at cook books, grocery shopping, reading cooking blogs, dirtying more dishes, or actually booking. I was a woman on a mission....a cooking mission while the Chef, Adam, was at work....Yes, he is actually a chef. I don't just call him that for fun. Believe it or not, for being a chef, he is fairly pick when it comes to food and HATES olives. However, I got him to try a bite...mostly because I pleaded and begged. I am sure that bribing him with pie (next post) and left over spaghetti also had something to do with it, lol.

My last two blog talked about The Pioneer Woman Cooks cookbook that I just bought. Well this will be no different, but I promise the other post to come tonight will be. :) Tonight I tried out Ree's Olive Cheese Bread from the cookbook. Yum! However, I did make a few substitutions. The recipe calls for both black and green olives and I detest green olives, so I used mushrooms instead because I do like them. I also changed the cheese to Kolby Jack and Mozzarella, mostly because I couldn't find the kind of cheese that she used on hand at Kroger. Other than that I stayed true to the recipe. I must say, I have NEVER bought real mayo because I just don't like it that much. However, I did follow that piece of the recipe as it said in the cookbook to NOT substitute, lol. This was a SIMPLE recipe to through together and I must say that it is DIVINE and so full of flavor. Way to go Ree, again! :)

Buy it! She is amazing!

Although I felt like cooking up a storm, I also went easy on recipes tonight. Spaghetti is so good and so easy that it seemed like the obvious and perfect choice to go with Ree's bread tonight. My spaghetti is always the same, but amazing. I only use whole wheat pasta because it is healthier and I prefer the taste as well. I also always have a huge glass of skim milk with pasta, or two. As for sauce, I will never make my own. This isn't because I doubt my sauce making ability, but because I LOVE LOVE LOVE my Uncle's pasta sauce. It is so amazing. He actually sells it in stores, and here is where the family plug comes in. I am not kidding when I say since I first tried his sauce years ago, I have never used any other sauce. It is great for lasagna, meatloaf, spaghetti, chicken Parmesan and so much more. It's based out of Firth, Nebraska and is called Sorrisos. They have many different flavors, but I opted for Tomato Basil tonight. Try it, you will love it! You can check the sauce out at the website or on the Sorrisos Facebook page. It is amazing and a perfect match to the Olive Bread.

YUM! I love Sorrisos!
Okay, okay. I will stop babbling on and on and get to the recipe, lol. Here you go!

Olive Cheese Bread (by Pioneer Woman)

Ingredients:

1 pound (I used a little less) Monteray Jack Cheese, shredded
1/2 cup mayonnaise (the real kind)
1 stick butter, softened
2 green onions, finely chopped
14.5 oz can Black Olives, finely chopped (drain first)
6 oz can Green Olives (I used mushrooms), finely chopped (drain)
1 loaf French bread.

Directions:

*Preheat oven to 350.

*Cut bread in half and then in pieces

*Mix all other ingredients together and spread an even layer (I used a lot) on each piece of French bread.

*Bake 10ish minutes at 350.

***Enjoy! YUM YUM YUM!***


It's pretty and tastes fabulous!

Wednesday, April 21, 2010

The Pioneer Woman Cooks! *Penne alla Betsy*


So I must say that I am SO LOVING The Pioneer Woman Cooks! cookbook. I have been reading bits of Ree's cookbook over the last two or three days. I was a little apprehensive about buying it online without having ever looked at it, but I decided to go for it. It turned out to be a GREAT idea. I love her cookbook for many reasons. It is full of pictures of her ranch and kids that she has taken over the years and chalked full of good stories that go along side each recipe. Her recipes are simple, fun, and seem like they will all be super tasty. I am through most of the breakfast section and cannot wait to sit down and read more of the cookbook tonight when I finally get to go home at 7:30, ugh. It is literally so good that you can sit down and read it like a normal book or novel. I suggest that EVERYONE goes out and buys it. However, if you don't want to buy yet another cookbook, head over to her website Pioneer Woman Cooks! for great recipes, stories, and pictures. She is a God-sent. Her website and cookbook can be used by anyone and everyone since she goes through every small step with pictures and her own experiences. I cannot wait to start actually cooking from the book and her website.


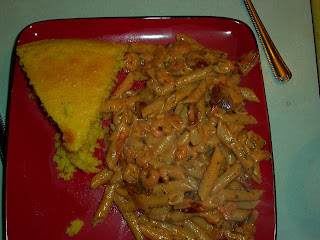
This recipe, although originally from Pioneer Woman, I found at What's Gaby Cooking . I made this with the previously posted cornbread that I found on Two Peas and Their Pod. I will say that while this recipe was amazing and very flavorful, I would suggest cutting it in half. This was back when I lived by myself, before the days of Adam and I ended up taking a huge bowl down to my friends Debjani and Kuntal since they live right below me and it had shrimp in it. I think that this recipe would also work great with chicken. I did make it more flavorful (not that it needs it) by adding my own Slow Roasted Tomatoes to the mixture. I don't have a recipe for my slow roasted tomatoes up, but next time I make them (which will hopefully be soon, since I am out) I will try and remember to post my recipe. This, like all of Ree's recipes was simple to make. I hope that you enjoy it as much as I did.

Penne Alla Betsy

Ingredients:

  • 1 lb penne
  • 1 lb shrimp, peeled and de-veined
  • 2 tbsp butter
  • 2 tbsp olive oil
  • 1 onion, diced
  • 2 garlic cloves, chopped
  • 1/2 cup white wine
  • 14.5 oz tomato sauce
  • 1 cup heavy cream
  • 1/4 cup chopped parsley
  • 6 basil leaves (or dried basil)
  • salt and pepper
Directions
  1. Bring a large pot of water to a boil and cook the pasta until al dente
  2. In a skilled over medium heat, add 1 tbsp butter and 1 tbsp oil. Cook the shrimp until they are pink. Remove the shrimp, season with salt and pepper and set aside.
  3. Next, chopped the onion and the garlic. In the skillet add the remaining butter and oil as well as the garlic and the onion. Saute for about 5 minutes.
  4. Add the wine and allow it to evaporate
  5. Add the tomato sauce and reduce the heat to low. Then add the creamy and stir. Add the parsley too!
6. Add the shrimp, taste for seasoning and adjust if needed, add the pasta and serve garnished with basil!
**And PW's Cornbread!**

Skillet Cornbread


I am on a role with posting old recipes. Although I should be going over my presentation that I have to give in about 3 hours, I have decided to take a mid-day break from all of of hustle and bustle of grad school, which I am sure would be frowned up on by many, lol. I found this recipe on Two Peas and Their Pod. However, it originally came from Pioneer Woman Cooks! Ree just recently (within a few months) came out with her first cookbook and has an amazing blog full of easy to make, flavorful recipes. She seems like such a joyful woman and I have high hopes of getting to meet her one day on a book tour. I have spend hours on her Blog recently and she always has fun stories, beautiful pictures, and tasty recipes galore on there.

I made this skillet cornbread in a normal cake pan and put it in the oven because at the time I did not have a cast iron skillet. However, Adam is huge on cast iron skillets and just recently purchased one for us. So I am sure that the next time I make this it will be the "Ree way" of making it. This was my first attempt with cornbread and it went fairly well. No big surprises, or catastrophic events, to speak of. I also made another one of Ree's recipes to go with her cornbread which I will be posting in a few minutes hopefully. That post will also talk about her new cookbook. It was helpful because they both call for buttermilk :)

Skillet Cornbread

1 cup yellow cornmeal
1/2 cup all-purpose flour
1 tsp. salt
1 Tbsp. baking powder
1 cup buttermilk
1/2 cup milk
1 large egg
1/2 tsp. baking soda
1/4 cup + 2 Tbsp. shortening

*Preheat oven to 450 degrees F.

*In a bowl, combine cornmeal, flour, salt and baking powder & whisk together.


*Measure buttermilk and milk in a measuring cup. Stir in the egg with a fork. Add baking soda and stir.

*Pour into the bowl with the dry ingredients and stir with a fork just until combined.

*Melt 1/4 cup shortening in the microwave.

*Slowly add melted shortening to the batter, stirring until combined.

*In an iron skillet over high heat, melt the remaining 2 Tbsp. shortening. Pour the batter into the hot skillet and spread to even out the surface. Cook on the stovetop for about a minute, then bake in the oven for 15 to 20 minutes, or until golden brown. (I did this in a normal cake pan)


This is the picture of my cornbread with the other Pioneer Woman recipe that I made to go with it. They were a GREAT combination!

Buttermilk Cake with Fresh Rasberries


Wow, it has been forever since I have posted a new recipe. Don't worry, it isn't that I have been on a cooking hiatus for months and months. Just more so that graduate school has been so busy that I never find time to sit down and post a new recipe. The last thing that I think about when I actually do have time to just sit down is doing exactly that...sitting and watching a movie or spending time with Adam.

I have made this cake twice now, both times with raspberries. The second time I used frozen because that is all that I could find within a 30 mile radius of my tiny home town over Christmas break. It is much better with fresh fruit, just take my word on that part. I originally found this recipe here, on Two Peas and Their Pod. Maria has so many excellent recipes that I will probably never get around to trying all of them for myself. You can make this cake with pretty much any fresh fruit that you want. Enjoy!

Buttermilk Cake with Fresh Raspberries:

-1 cup all-purpose flour

-1/2 teaspoon baking powder

-1/2 teaspoon baking soda

-1/4 teaspoon salt

-1/2 stick unsalted butter, softened

-2/3 cup plus 1 1/2 tablespoons sugar, divided

-1/2 teaspoon pure vanilla extract

-1 large egg

-1/2 cup well-shaken buttermilk

-1 1/4 cups fresh fruit (raspberries)


Directions:


-Preheat oven to 400°F with rack in middle. Butter and flour a 9-inch round cake pan.


-Whisk together flour, baking powder, baking soda, and salt.

-Beat butter and 2/3 cup sugar with an electric mixer until pale and fluffy, about 2 minutes, then beat in vanilla.


-Add egg and beat well.


-At low speed, mix in flour mixture in 3 batches, alternating with buttermilk


-Spoon batter into cake pan, smoothing top.


-Cover with fresh fruit and then sprinkle the remaining 1 1/2 tablespoons of salt over the fruit.


-Bake until cake is golden and a wooden pick inserted into center comes out clean, 25 to 30 minutes.


-Cool in pan and serve with Cool-Whip